Android组件化开发项目中,一个很大的问题就是解耦之后组件间的通信,Activity/Fragment的跳转切换、组件间数据传递、数据共享等,可以通过广播Broadcast、EventBus等决绝部分问题,不过多数实践证明Broadcast和EventBus随着业务扩张,会使数据传递、代码调用变得难以追踪。阿里的ARouter也是一个用于解决组件间通信的框架,支持跨模块页面跳转、跨模块API调用、通过URL映射到模块内部、拦截跳转、支持注解等,简单易用。
个人觉得ARouter功能比较丰富,也感觉有些重量级,包括gradle工程文件配置、注解URL与代码耦合,我曾经接触过一个团队,他们组内非常抵触注解开发,因为他们觉得注解开发方便但会使代码变得难以追踪。加上小小的造轮子热情,组件化开发中我没有引入ARouter,而是手写了一套路由框架BRouter,这个框架很大程度上借鉴了SRouter。
系列文章
Android组件化-基础框架搭建
Android组件化-组件间通信BRouter
Android组件化-风格统一&主题变色
Android组件化-MVP设计模式
BRouter设计思路
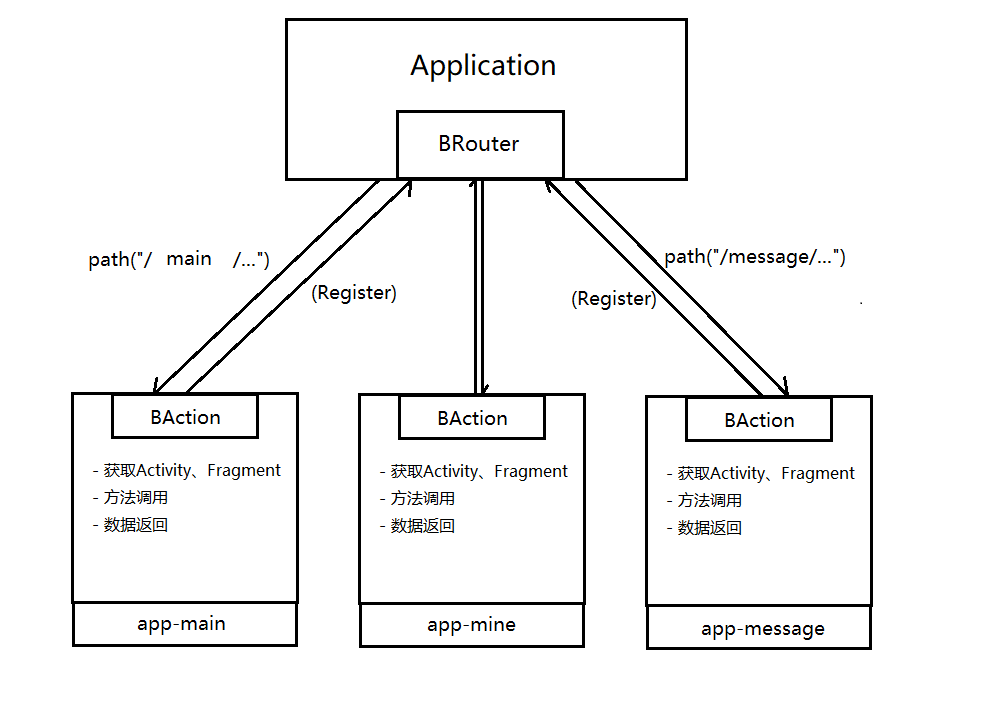
首先创造一个路由中心,每个module都在路由中心进行注册,组件间通信通过向路由中心发出请求,路由中心进行转发并返回处理结果。路由请求指定URL(e.g “/modeule/…”)并可携带参数,返回值可以是Activity、Fragment、任何数据或者为空。BRouter模型如下:

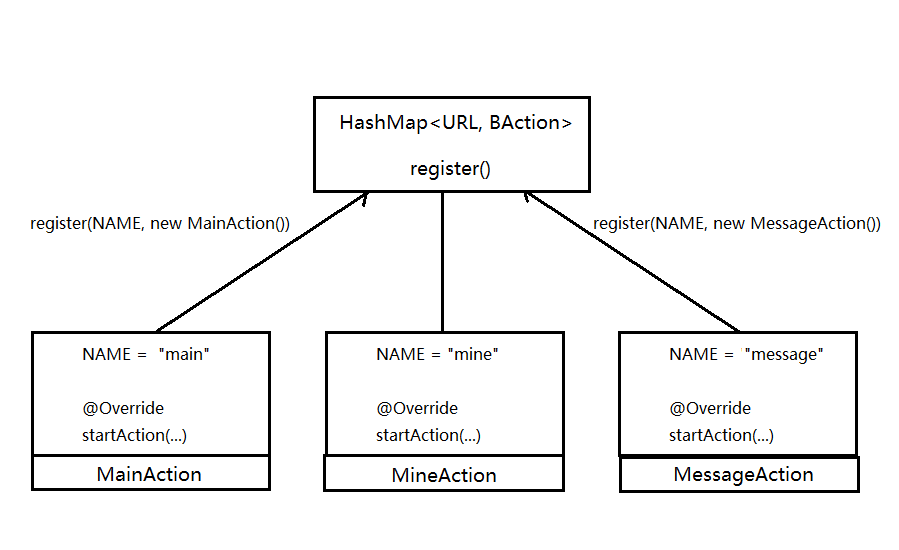
各模块实现一个BAction,在路由中心通过<path, BAction>存储在一个HashMap中,路由注册以及请求转发都是通过这个HashMap来处理,单模块实现BAction代码如下(e.g app-message):
1
2
3
4
5
6
7
8
9
10
11
12
13
14
15
16
17
18
19
20
| public class MessageAction extends BAction {
public static final String NAME = "message";
@Override
public Object startAction(Context context, String path, Bundle param, BEvent event) {
switch (path) {
default: {
Intent intent = new Intent(context, MessageActivity.class);
intent.putExtras(param);
intent.setFlags(android.content.Intent.FLAG_ACTIVITY_NEW_TASK);
context.startActivity(intent);
}
}
return null;
}
}
|
路由中心在app壳工程中的Application中初始化,实例化每个Action方法到BRouter的路由列表中,如下:
1
2
3
4
5
6
7
8
9
10
11
12
13
| public class AppApplication extends BaseApplication {
@Override
public void onCreate() {
super.onCreate();
...
BRouter.register(MainAction.NAME, new MainAction());
BRouter.register(MineAction.NAME, new MineAction());
BRouter.register(MessageAction.NAME, new MessageAction());
...
}
}
|
BRouter是单例模式,在多进程情况下,Application会多次初始化,每个进程中都会持有一个BRouter并实例化Action,所以每个BRouter持有一份路由列表,BRouter适用于多进程的。
BRouter内部原理解析
BRouter代码如下:
1
2
3
4
5
6
7
8
9
10
11
12
13
14
15
16
17
18
19
20
21
22
23
24
25
26
27
28
29
30
31
32
33
34
35
36
37
38
39
40
41
42
43
44
45
46
47
48
49
50
51
52
53
54
55
56
57
58
59
60
61
62
63
64
65
66
67
68
69
70
71
72
73
74
75
76
77
78
79
80
81
82
83
84
85
86
87
88
89
90
91
92
| public class BRouter {
private static volatile BRouter instance;
private HashMap<String, BAction> actions;
private BRouter() {
actions = new HashMap<>();
}
public static BRouter getInstance() {
if (instance == null) {
synchronized (BRouter.class) {
if (instance == null) {
Log.d("BRouter", "BRouter initing... ");
instance = new BRouter();
}
}
}
return instance;
}
public static void register(String name, BAction action) {
if (getInstance().actions.containsKey(name)) {
return;
}
getInstance().actions.put(name, action);
}
public static BRouterRes push(Context context, BRouterReq req) {
BRouterRes res = new BRouterRes();
BAction action = getAction(req);
if (action != null) {
Object object = action.startAction(context, req.getPath(), req.getParam(), null);
res.set(object, BRouterRes.CODE.OK);
} else {
res.set(BRouterRes.CODE.NOT_FOUND);
}
return res;
}
public static BRouterRes push(Context context, BRouterReq req, BEvent event) {
BRouterRes res = new BRouterRes();
BAction action = getAction(req);
if (action != null) {
Object object = action.startAction(context, req.getPath(), req.getParam(), event);
res.set(object, BRouterRes.CODE.OK);
} else {
res.set(BRouterRes.CODE.NOT_FOUND);
}
return res;
}
private static BAction getAction(BRouterReq req) {
if (getInstance().actions.containsKey(req.getAction())) {
return getInstance().actions.get(req.getAction());
}
return null;
}
}
|
BRouter使用单例模式,默认构造一个HashMap actions作为路由列表,通过register方法向actions添加路由,自定义URL作为key,new Action() 作为value。

组件间通信转化为路由请求,路由请求首先构造请求对象BRouterReq,然后调用BRouter的push方法进行路由转发,并通过BRouterRes进行响应,以app-main开启app-message消息界面为例,
1
2
3
4
5
6
| BRouterRes res = BRouter.push(
getApplicationContext(),
BRouterReq.build().action("message").path("message/list")
);
getFragmentManager().beginTransaction().add((Fragment) res.data(), "").commit();
|
路由请求构造方式为 BRouterReq.build().action(URL).param(key, value),BRouter.push(context, req, callback)进行转发,同步处理可获得返回结果BRouterRes,异步处理可通过BEvent callback实现。MessageAction具体处理逻辑在模块内部实现,如下:
1
2
3
4
5
6
7
8
9
10
11
12
13
14
15
16
17
18
19
20
21
22
23
24
25
26
| public class MessageAction extends BAction {
public static final String NAME = "message";
private static final String MESSAGE_LIST = "message/list";
@Override
public Object startAction(Context context, String path, Bundle param, BEvent event) {
switch (path) {
case MESSAGE_LIST: {
data = new MessageFragment();
}
break;
default: {
Intent intent = new Intent(context, MessageActivity.class);
intent.putExtras(param);
intent.setFlags(android.content.Intent.FLAG_ACTIVITY_NEW_TASK);
context.startActivity(intent);
}
}
return data;
}
}
|
请结果返回MessageFragment实例,在app-main中进行展示。BRouterReq支持多种参数形式,内部通过Bundle对象存储参数,方便参数在activity以及fragment中传递,可以整个Bundle对象直接set进去。
1
2
3
4
5
6
7
8
9
10
11
12
13
14
15
16
17
18
19
20
21
22
23
24
25
26
27
28
29
30
31
32
33
34
35
36
37
38
39
40
41
42
43
44
45
46
47
48
49
50
51
52
53
54
55
56
57
58
59
60
61
62
63
64
65
66
67
68
69
70
71
72
73
74
75
76
77
78
79
80
81
82
83
84
85
86
87
88
89
90
91
92
93
94
95
96
97
98
99
100
101
102
103
104
105
106
107
108
109
110
111
| public class BRouterReq {
private String action;
private String path;
private Bundle param;
private BRouterReq() {
param = new Bundle();
}
public static BRouterReq build() {
return new BRouterReq();
}
public BRouterReq action(String action) {
this.action = action;
return BRouterReq.this;
}
public BRouterReq path(String path) {
if (this.param == null) {
this.param = new Bundle();
}
this.path = path == null ? "" : path;
return BRouterReq.this;
}
public BRouterReq data(Bundle data) {
if (this.param == null) {
this.param = new Bundle();
}
if (data != null) {
this.param.putAll(data);
}
return BRouterReq.this;
}
public BRouterReq data(String key, Object value) {
if (this.param == null) {
this.param = new Bundle();
}
if (value == null) {
this.param.putString(key, null);
} else if (value instanceof String) {
this.param.putString(key, value.toString());
} else if (value.getClass().equals(int.class)) {
this.param.putInt(key, (int) value);
} else if (value.getClass().equals(boolean.class)) {
this.param.putBoolean(key, (boolean) value);
} else if (value.getClass().equals(float.class)) {
this.param.putLong(key, (long) value);
} else if (value.getClass().equals(char.class)) {
this.param.putChar(key, (char) value);
} else if (value.getClass().equals(short.class)) {
this.param.putShort(key, (short) value);
} else if (value instanceof Serializable) {
this.param.putSerializable(key, (Serializable) value);
} else if (value instanceof Parcelable) {
this.param.putParcelable(key, (Parcelable) value);
} else {
this.param.putString(key, null);
}
return BRouterReq.this;
}
public String getAction() {
return action;
}
public String getPath() {
return path != null ? path : "";
}
public Bundle getParam() {
return param;
}
}
|
BRouterRes包含路由请求响应的ERROR_CODE、ERROR_MSG以及处理结果data,若调用成功code为OK,调用方可通过code判断请求是否成功,从而形成闭环控制。
1
2
3
4
5
6
7
8
9
10
11
12
13
14
15
16
17
18
19
20
21
22
23
24
25
26
27
28
29
30
31
32
33
34
35
36
37
38
39
40
41
42
43
44
45
46
47
48
49
50
51
52
53
54
55
56
57
58
59
60
61
62
63
64
65
66
67
68
69
70
71
| public class BRouterRes {
private CODE code;
private String msg;
private Object data;
void set(CODE code) {
this.code = code;
this.msg = code.toString();
}
void set(Object data, CODE code) {
this.data = data;
this.code = code;
this.msg = code.toString();
}
void set(Object data, CODE code, String msg) {
this.data = data;
this.code = code;
this.msg = msg;
}
public Object data() {
return this.data;
}
public String string() {
JSONObject res = new JSONObject();
try {
res.put("code", code.name())
.put("msg", msg)
.put("data", data);
} catch (JSONException e) {
e.printStackTrace();
}
return res.toString();
}
public enum CODE {
OK("OK"),
ERROR("ERROR"),
NOT_FOUND("ACTION_NOT_FOUND");
private final String message;
CODE(final String msg) {
this.message = msg;
}
@Override
public String toString() {
return this.message;
}
}
}
|
BRouter实践
BRouter已经自己使用在项目中,基本满足需求且稳定。我的开源项目中也在使用,传送门Modulize。
(完)

